
 CAD
CADRebreathers for Photographers and Video Makers – Is CCR Worth It?
As we gain more experience with diving and underwater imagery, there comes a point in time where you feel the need to take things to another level. Sometimes it’s the desire to acquire new gear – We all suffer from a bit of GAS (gear acquisition syndrome) e.g. my photos would be so much better if I had THIS type of strobe or this lens – but it can also take the form of learning a new skill or taking a new course.

The late Andy Phillips who I had the absolute pleasure of having as my IDC instructor always stressed the importance of Never stop learning and being a student. Even he, as one of the top instructors in the world, still made it a point to learn something new and challenge himself every year.
I wholeheartedly agree with this and in the world of diving and underwater photo/video there is always something new to learn, whether it be a new shooting technique, piece of gear or a completely new style of diving altogether.
At the top of my list for new skills, I really wanted to learn for the past few years was rebreather diving. The thought of being silent in the water, without bubbles and virtually invisible to marine life was super intriguing. I was fortunate enough to have gotten an opportunity to get my certification last month on the Triton CCR unit while shooting some video for Bali Dive Trek in Amed, Bali. The following is my take away from the experience.


If you are already familiar with CCR then you can skip down to the bottom to read about my experience with the camera.
Very briefly: For those of you who might not know what a rebreather is (or CCR – Closed Circuit Rebreather) According to Wikipedia:
“A rebreather is a breathing apparatus that absorbs the carbon dioxide of a user’s exhaled breath to permit the rebreathing (recycling) of the substantially unused oxygen content, and unused inert content when present, of each breath. Oxygen is added to replenish the amount metabolized by the user. This differs from an open-circuit breathing apparatus, where the exhaled gas is discharged directly into the environment. The purpose is to extend the breathing endurance of a limited gas supply, and, for covert military use by frogmen, eliminating the bubbles appearing when using an open circuit system.”
In the most basic terms, you fill the closed system with gas, breathe in and exhale into bags or “counter lungs”. The gas gets pushed through a cylinder filled with a chemical that removes the CO2. After, the tiny bit of O2 that your body uses (or metabolizes) is replaced into the gas mixture (from a 100% O2 cylinder) giving you the proper blend of gas for your depth and keeping a stable po2.
Think of exhaling into a balloon and rebreathing that air but having the CO2 removed and the exact amount of O2 needed put back in. You could breathe through that balloon forever as long as you could remove the CO2 and add O2. It seems like a complicated process but in fact it is super basic and in theory has been around since the 1600s, with CO2 scrubbing being used since the 1800s. Here is a very interesting timeline of rebreather history: https://divermag.com/rebreather-history-from-conception-to-the-modern-era-1680-2012-2/
Other notable rebreather applications would be submarines, underwater habitats, spaceships / space stations, astronaut space suits and of course our own atmosphere on planet earth.
Without getting too much into the technical aspect of how rebreathers work let’s take a look at some of the advantages and disadvantages of using them and how they relate to underwater photo/video.
1. First of all the obvious advantage: NO BUBBLES!
Being silent underwater is an entirely different experience. The marine life either doesn’t react at all or is sometimes even curious about your presence. Many times I had gotten face to face with larger fish, turtles and schools without them moving a bit. Big groups of juveniles along the reef that typically retreat into the coral when you approach, darting in and out of hiding with every bubbly exhale, simply stay put orbiting the same space. It’s a very unique experience that you notice right away. The other advantage of not having bubbles is that you can hear all of the sounds of the reef or open water. Unknown to most is that fish actually make noises. It’s a little like an underwater rainforest with all of the sounds that are happening all around you.
Don’t believe me? Check this out:
Given that the fish pay less attention to you gives you a great opportunity to photograph behaviors that marine life might not display when they are weary of your presence, as well as the ability to get much closer and head on. Reef scenes also become much more alive without all of the fish hiding in defense and skittish animals such as sharks will not dart off at the first sign of a diver. You will encounter much more marine life giving you a better opportunity to get a great shot. Also, if you are shooting anything above you like a manta you won’t have to worry about your own bubbles ruining your shot.
2. Buoyancy
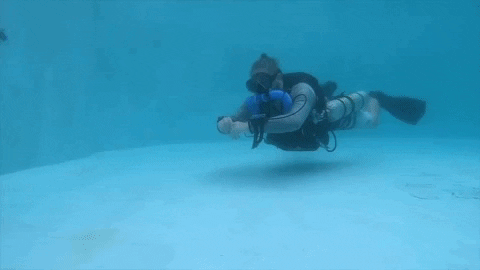
Probably the most difficult thing to get used to while on CCR is buoyancy. It is totally different and the better control you have of your buoyancy while diving on a normal open circuit, the harder it will be to adjust. Since there is typically not much release of gas like on normal open circuit SCUBA, your breathing will have almost no effect on your buoyancy or position in the water. This is a completely odd feeling, especially when shooting video.
Normally if you are following a subject, flying over the reef or filming any moving shot you will make slight adjustments to your buoyancy using your breathing. Well…. throw all of that out of the window because it won’t work. In fact, when you ascend and descend not only will the volume in your BCD change but so will the volume in your loop. Forget everything you learned and all of the hard work you put into master buoyancy and get ready to feel like an open water student again. Now with that being said, once you get the hang of it you’ll find it easy to hold your position during static shots or when moving horizontally. Almost like having an underwater gimbal or holding your breath (which we never do… right gang?)
3. Longer bottom time and perfect gas blend
Who wouldn’t want to spend more time underwater? If the amount of gas you have available is typically your only limitation then you are in luck. Given that you are reusing the same air over and over you can virtually stay down for hours and hours. Your only limitations will be how long you can use your CO2 scrubber (recommended 6-8hrs for a new canister fill) and the amount of O2 you are carrying. Gas consumption is extremely low since it is governed by metabolism, not depth. The average consumption of O2 is about 1L/min. For a rough example, that means a tiny 3L tank of O2 filled to 200 bar equals 600L of gas. That equals 10 hours worth!
For the perfect blend: Imagine that you are taking a virtual nitrox factory with you underwater. Because you are telling the system (or manually injecting) the perfect blend of O2 regardless of depth that means you will have a consistent po2 but different percentages of O2 at every depth. It’s like carrying 4-5 tanks of different nitrox blends for every depth, including 100% O2 for when you get to 6m. Your computer will take this into account and calculate your NDL and deco requirements in real-time based on what percentage of O2 you are using. Cool huh?
For tec divers using trimix this will be a game-changer. Helium is VERY expensive but with a rebreather you are reusing the gas over and over, so an open circuit dive that would have typically cost around $600 in gas will now be around $30. It’s a no brainer to justify the initial investment, and the unit could pay for itself in just a few dive trips.
Some things to take into consideration once you decide you would like to enter the world of rebreathers are what specific model you would like to train on, where and who you would like to train with. Also, if you would prefer an mCCR (manual – you manually control your po2 by injecting O2 and diluent) or an eCCR (Electronic – a solenoid will inject O2 automatically maintaining a constant pO2 for whatever you set) Both have their advantages and disadvantages. I suggest you do some research or ask your instructor before making a decision. Each manufacturer requires you to be certified on their specific unit before they will even allow you to purchase one. This goes to show how important the training is for your safety, please do not take this lightly.
The Training
For my course I was training on the Triton CCR (which is an mCCR or manual CCR) course material from IANTD – INTERNATIONAL ASSOCIATION OF NITROX & TECHNICAL DIVERS – with instructor Antoine Martin of Bali Dive Trek in Amed, Bali. I was joined by one other diver that had already previously trained on another unit and was doing a crossover to the Triton. The course was spread out over 6 days

During the training there is some theory on the history of rebreather diving along with a bit of physiology and physics that should be easy to grasp for any Advanced and Nitrox certified divers.


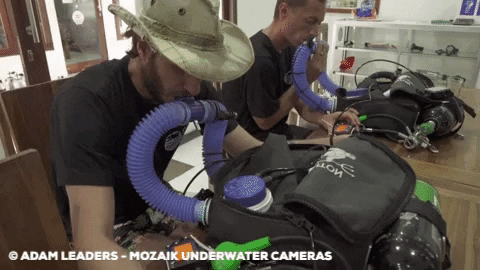
Next we were introduced to the unit and shown how it operated. After, we went through a checklist and learned how to put the unit together. This was much more in-depth (with more steps) but similar to your open water course when you learned how to set-up your scuba kit for the first time. Everything is a bit foreign and confusing but the more you do it the easier it gets until it’s second nature.


Once we entered the pool for the confined session that is where everything went topsy turvy. As someone who feels pretty confident with their buoyancy on open circuit, I felt like I had never SCUBA dived before. You are relying almost totally on your weights and BCD. There is no compensation from your breathing. At first, I was either on the bottom or on the surface. It was such a foreign feeling but once you get the hang of it it is super easy… well, to stay at the same depth that is.


More training in the pool practicing buoyancy and drills. More theory and then we went into the open water. During the open water portion, we spent a lot of time on our 2-3 hr dives practicing emergency and bailout drills, finning and covering quite a number of scenarios based on problems that might occur on a rebreather. Super in-depth and demanding course but at the end, I felt quite confident on the unit and had a huge sense of accomplishment.
Diving with a camera on CCR
There are different configurations when it comes to diving on a rebreather: Backmount rebreather with a stage for bailout, front mount rebreather with a back mount for bailout/diluent, front mount rebreather with side-mount configuration… etc. What you will use will depend on your unit and the style of diving you would like to do.
I was on the Triton CCR, a front mount unit with a side mount configuration for my bailout and deco gas. We were doing shore dives so it was quite a challenge to get geared up and then carry my camera from the beach. I would definitely recommend starting with a back mount configuration if you are carrying a camera, whether it be the Triton CCR on the front and your bailout/diluent on the back, or a 100% back-mounted system. Unless of course side mount is your typical configuration in which case you should go with whatever you are most comfortable with.
Buoyancy while filming
This was a huge advantage in some ways, especially when shooting stationary subjects. The bottom line, you don’t move vertically at all (if you are neutral to begin with). If you are trying to hold your position for a shot on a normal open circuit you are typically either: trying to limit your breathing (also to avoid scaring the subject with your bubbles) or constantly adjusting/compensating your position with your breathing. Not only is this not necessary but it won’t work on a rebreather. As long as your BCD is properly being used you will magically just float in the same place, regardless of whether you are inhaling or exhaling. No more shaky shots. If you are trying to nail a macro shot this becomes a huge advantage and takes almost no effort at all. I know I keep re-stating this but it is such an odd and unique feeling that it’s difficult to understand until you have experienced it.
On the other hand with moving shots like flying over the reef or moving with a subject there are 2 things to consider.
1. Your shots will be almost gimbal smooth – if your camera is weighted properly and you fin smoothly. You will effortlessly glide over the reef when you are at the same depth almost like being on an underwater scooter.
2. Changing your depth mid shot will be a challenge. Remember this is a closed-loop system so that means as soon as you start ascending not only will the air in your BCD expand but so will the air in your loop. No more taking a breath in to effortlessly avoid an object (coral, rocks, sponge, lionfish!) or go over an object on uneven topography. This will have to be done manually while adjusting the gas in your loop and BCD. I am still trying to master this and find my own technique for making adjustments hands free. Suggestions welcomed.
Filming without bubbles

This was the aspect of rebreather diving that intrigued me the most and it did not disappoint. All of your interactions with marine life are totally different. If you are shooting video with only ambient light (no video lights) you are virtually invisible to them. Some will even be curious and approach you. I was able to glide through schools of fish without them hardly giving me any space to pass, groupers allowed me to get eye to eye with them and larger pelagic animals that would normally hear you coming from a distance and leave the area before you even arrive would stay put giving me a much greater chance of spotting them. On my first dive to 50 meters we even had a thresher shark come visit us 3 times passing quite closely.
If behavior shots are what you are looking for you are in luck, most animals will continue their normal routine without being apprehensive of your presence. You realize the contrast of how they behave when they sense you near them on an open circuit. You have a much better sense of being part of the ocean and seeing marine life in their natural state.
Safety and awareness


The one thing that I would like to stress is the importance of is staying aware of your unit and po2 while on CCR.
As all of us do when we are operating a camera underwater we sometimes forget to keep track of important things like air consumption, depth, NDLs and with CCR your po2. This is a very important aspect of rebreather diving that is stressed throughout the course. Luckily you will have redundant computers and monitors to keep track of everything as well as the fact that most units even come standard with a HUD (heads up display) a small display on your DSV (breathing hose) and in front of your eyes that has color indicators to alert you of any issues. This I found extremely useful and would even consider implementing on my open circuit kit. You can focus on your shot and not worry about checking your computer. As far as worrying about your air consumption it’s almost a total non-issue anymore given the fact that if your po2 is steady you will most likely have more gas available to you than you would ever want to stay underwater. If you would like to spend 3 hrs on one dive searching the muck for macro subjects, not a problem in the slightest… as long as your buddy agrees 🙂
In conclusion, my experience shooting video and taking photos on CCR was amazing and I look forward to all of the opportunities it will open up in the future to get great shots. The training was challenging but in a good way. It is always good to have a humbling experience diving and learn something new in order to avoid becoming complacent. I would definitely recommend anyone with the means and ambition to take it upon themselves to give it a try. Most instructors will offer a 1 day try dive or intro on the units and it is a great way to know first hand if it is right for you. Plus then you get the experience and bragging rights to say that you have dived CCR 😉 . For those that enjoy taking liveaboard trips (and especially for those who are interested in tec diving and going deep) it is an excellent investment that will end up paying for itself through the added enjoyment you will get with:
- Longer dives
- Better experience underwater
- The peacefulness of silent diving
- Better shots
- and of course the Cost of gas!
If you are already making the investment for a big trip like Galapagos, Cocos, Maldives etc. It’s a no brainer. You should be getting the most out of those once in a lifetime experiences. Huge thank you to Antoine Martin at Bali Dive Trek in Amed, Bali (a wonderful dive resort nestled between beautiful Agung volcano, rice fields and the ocean ) for giving me this opportunity. If you have any interest I would highly recommend contacting him at Bali Dive Trek or Bali Dive Trek Facebook for any questions you might have.

- 10 Things You Must Know Before Starting a Career as an Underwater Photographer – April 15, 2021
- What is the Best and Fastest Way to Learn Underwater Photography – September 8, 2020
- How to Extract Perfect Still Photos from 4K Video – May 14, 2020