
 USD
USDThe Complete Guide to Practicing at Home for Underwater Photographers
This article was originally written in 2020 when the pandemic restrictions were in place and people were completely locked to their home. I’ve always been a strong believer in practicing at home and now that we are back to normal times, time to make this article normal.
One of the most common issues with people upgrading their gear is that they jump off the boat and then try to shoot with their camera/housing for the first time. This is a big mistake that almost always results in bad photos and in many cases also some stress and frustration.
It is really not a problem to practice almost every aspect of underwater photography at home and then reach the boat when you are so confident, all you have to do is focus on your diving, buoyancy and the marine life around you.
1. Get Acquainted with your camera
This is the most straightforward thing you can do. Read the camera manual, watch some Youtube videos, take it outdoors, try to shoot flowers, birds, your dog, family. Learn how to get good shots in topside environment.

I am a very big fan of Youtube videos, you can learn anything this way. One thing to note, you’re going to need manual mode or at least Aperture priority mode when diving so practice with these modes and not just shoot auto.
One more thing to note, you will be using your flash a lot underwater so get acquainted with how to pop it up, how to put it on manual or auto mode, how to increase or decrease the flash exposure from the camera menus, how to force it to fire even when there is light outside.
2. Get Acquainted with your housing
Now that you’ve mastered using your camera, try to do the exact same thing with the camera inside the housing. You may feel a bit weird walking around the street with your housing so you can do this step at home or in your back yard.

The housing will feel bulky and heavy above the water so you can put it on a table or a high chair to help you. Rest assured its not going to be like that underwater, most housings are neutrally buoyant and are very easy to hold under water.
You know you’ve mastered this step when you can get the same results in the same amount of time when the camera is in the housing as you did when you just had the camera.
3. Strobes or Video lights
Most of you probably have strobes or video lights and that’s great because you really cannot get good results without them.
This is when things get a bit more complicated but… as this entire article suggests, there is pretty much nothing you cannot try and practice at home.
At this point, put together your entire underwater setup (note that you cannot practice with wet lenses since they need water to function properly).
Your setup is going to look something like this and now it will be really heavy and hard to hold so you must rest it down on something.

The biggest with underwater photography is separating the foreground from the background. In order to pratice that, I recommend taking a small doll or chess key or something similar that you can put on a table in the middle of the room far enough from the nearest wall to create the background/ foreground effect.
Now what you should do is practice lighting he subject and keeping the background dark, of course while the subject is properly focused and everything is exposed correctly. This requires a lot of trial and error but it is quite similar above or under the water.

Things to note:
- If you have TTL, this is the perfect moment to test it. That basically means no matter what aperture you choose in manual mode, the flash will fire at the right level and your subject will be properly exposed. Here’s a good explanation about TTL for underwater photography.
- Video lights get very hot above water, don’t leave them on for more than a couple of minutes and then let them cool off.
4. Pool Owners – You’re Lucky!
For those of you who have a pool in your house – we’re jealous!!
There are endless options to continue shooting underwater if you have a pool in your backyard! Here are a few suggestions:
Take photos of your family
Whether it’s your kids, husband, wife, grandma or your dog, everyone likes to play around in the pool. Use those models to practice underwater portraits! You can get creative with lighting, try to improvise colorful backgrounds, try out different outfits or even shoot at night with strobes for a very cool effect.
Learn more about shooting underwater portraits here
Who knows, maybe by the time this all blows over, you’ll have a new job as a pro underwater portrait photographer!
Practice Macro Photography (While practicing freediving)
Grab some marine life figurines, dunk them in the pool and shoot away! If you have your own tanks and some means of compressing them, you can stay longer while practicing. For the rest of us, this is a good time to improve your breathholding skills!
Warning – any breathholding activity should always be done with a buddy. Even in a pool. Both of you should preferably have proper freediving training.
You can use this time to try out new lighting techniques, practice shooting with one or two lights, try out back lighting (one strobe behind the subject, one in front). Get a snoot light and practice on a still subject. Or a light with color filters!
Test Weird Lens Combinations
If you have DSLR’s or mirrorless, you may have plenty of lenses which you don’t really use underwater except for that one macro or wide angle.
This is a good time to try those other lenses under your dome port. Even if they’re not officially compatible, perhaps some might work and produce great results. Especially prime lenses which might not be best for marine life, but could be perfect for portraits (see above).

Create an Underwater Studio
If you have a LOT of time on your hands, then you can put in some effort and construct a complete underwater studio, with old furniture or items you don’t really mind getting wet.
Stick a model in there and you’re bound to get hundreds or even thousands of likes on FB and IG. Your post might become even more viral than Coronavirus!
If you need some inspiration, check out Brett Stanley’s work.

5. Let The Editing Begin!
Remember those thousands of photos you took during your past dive trips and barely had time to view them, let alone edit them, before life took over?
This is their time to shine! Use that free time at home to open up those dusty folders on your hard drive, review the photos again and look for gems. It is very important to know what you can or cannot do at home on your computer, it will help you on your next dive trip.

I recommend using Lightroom or Adobe Bridge in combination with Camera RAW. You can easily flag photos as pick or reject, filter all the “picks” and start editing!
To learn more about post processing for underwater using Lightroom read this article.
6. Clean Your Gear Thoroughly
If you haven’t done so before, this is a great opportunity to take out all of your underwater camera gear and give it a thorough cleaning.
Seal your housing / lights and rinse everything in fresh water, to dissolve any salt residue that might still be there from the recent trip. Make sure to activate all buttons and controls under the water several times.
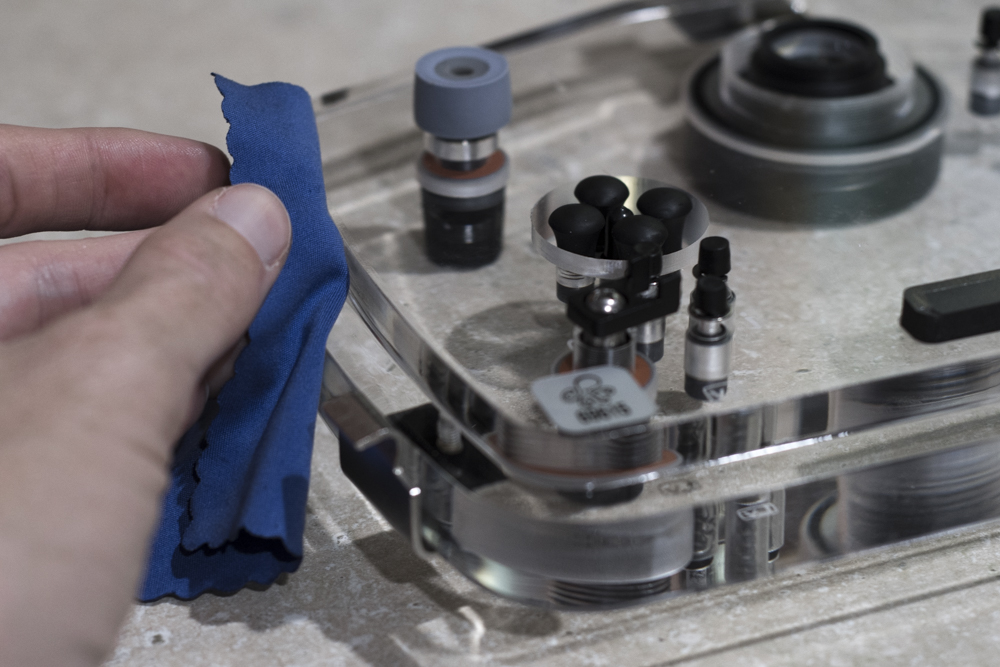
Clean all the o-rings, lube them with some silicone grease (not too much!) so they don’t dry out during this dry period.
Use a microfiber cloth to clean the inside and outside of your ports and domes, as well as lenses, wet and dry. You can also use some lens cleaning solution to get rid of any greasy fingerprints.
More about proper housing maintenance here

7. Learn More About Photography
Remember that underwater photography is still photography. If you want to improve your photos, deepen your knowledge of photography in general. Read about shutter speed, ISO and aperture. Learn more about depth of field, minimum focus distance, maximum flash sync speed and other advanced terms.
My personal tip is to learn and practice studio photography using external speedlights. Many aspects of studio photography are very relevant for underwater photography as well, since basically what you’re doing underwater is creating a mini studio with your own lights.
Learn how to set up a portable studio outside at sunset and which settings to use and I guarantee your wide angle underwater photos will be much better!

8. Shoot With Your Entire Rig Assembled Above Water
Using your system out of the water is actually a great simulation for using it underwater! Of course, if it’s a heavy DSLR rig it might be a bit difficult, so you can set it up on a table or tripod.
Assemble your entire rig and practice in different lighting conditions – indoors, outdoors, night time, sunset etc. Especially if it’s a new camera or housing. This will help you get more familiar with the buttons and controls so that you can adjust it quickly underwater. You can experiment with different settings and subjects to challenge yourself and try out different camera modes to see which one you’re most comfortable with.
Keep in mind that the main difference is how far your lights reach and how strong they are. Underwater the strobes will fade much faster so you’ll need to get closer to your subjects or use higher power output on the strobes. Other than that, it’s really quite similar.
WARNING – Do NOT use your video lights above water, unless they are designed for that (such as Sola GoBe). They can easily overheat. With strobes, do not shoot consecutively on high power or they will overheat as well. Allow them time to cool down between shots.

9. Take Online Underwater Photo Classes
Taking the time to learn the proper foundations of underwater photography from a pro is the fastest way to improve your photos. Whether you’re just starting out, or if you’re more experienced and would like to expand your knowledge on various subjects such as macro photography, wide angle, lighting, post processing etc., there are courses available for any level.
I offer several options as well as customized lessons for your needs. We will also start offering online group workshops so that you can also socialize while taking the course (without risk of infection of course!).
More info about underwater photo classes online here
Do you have any more fun ideas for underwater photographers at home? Share with us in the comments!

Visit his personal portfolio at www.ranmorphoto.com.
- Native Lenses vs. Wet Lenses for Underwater Photography – December 20, 2023
- The Complete Guide to Practicing at Home for Underwater Photographers – October 4, 2023
- Best Strobe for Underwater – The Ultimate Strobe Guide (Updated!) – June 29, 2023